
Bend Effect in Alight Motion: A Complete Guide
* What it does: Curves a layer around an anchored edge (Origin) so the opposite side arcs by an Angle. * Control map: Origin (pin) • Angle (amount/direction) • Start (where bend begins) • Before Start (Freeze/Same/Opposite) • Tune Head/Tune Tail (cap/smooth). * Starter values: Try Angle 10°–35° for clean mobile arcs; raise Start to bend only a tip/tail; keep Before Start = Freeze to protect text. * Fix kinks fast: Reduce either Angle or Start, then nudge Tune Head/Tune Tail at the worst frame only. * Best targets: Long, thin layers (ribbons, bars) for predictable, crisp results.
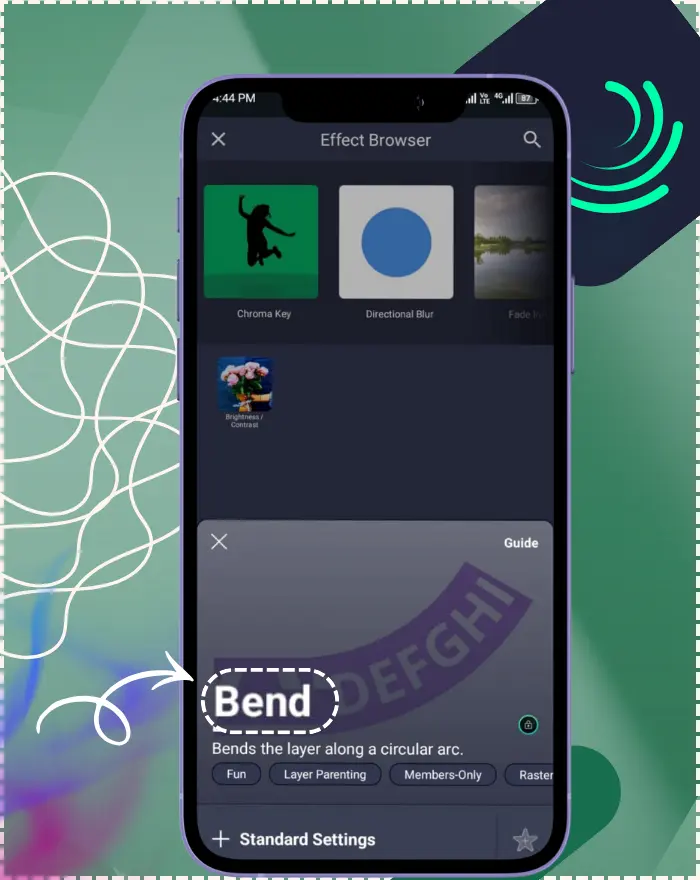
What Is the Bend Effect?
The Bend effect curves a layer along a circular arc—like gently flexing a ruler—so you can shape graphics into smooth bows, arcs, or springy motions without complex rigging. It’s fast, precise, and designed to work beautifully with simple shapes, text, and UI elements. Bend is a warp-style effect that bends the layer while keeping one side anchored. As of Alight Motion 5.0.273 (Android) or latest iOS 6.2.40 (updated 2025), the Bend effect supports smoother keyframing for mobile animations in this layer warping app, making it essential for how to use Bend effect in Alight Motion.
How It Works?
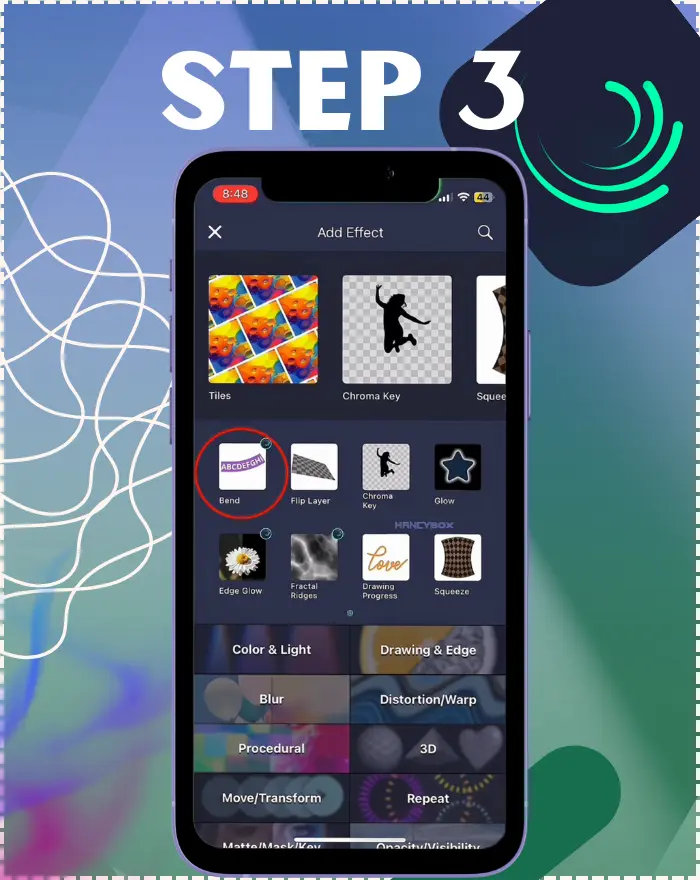
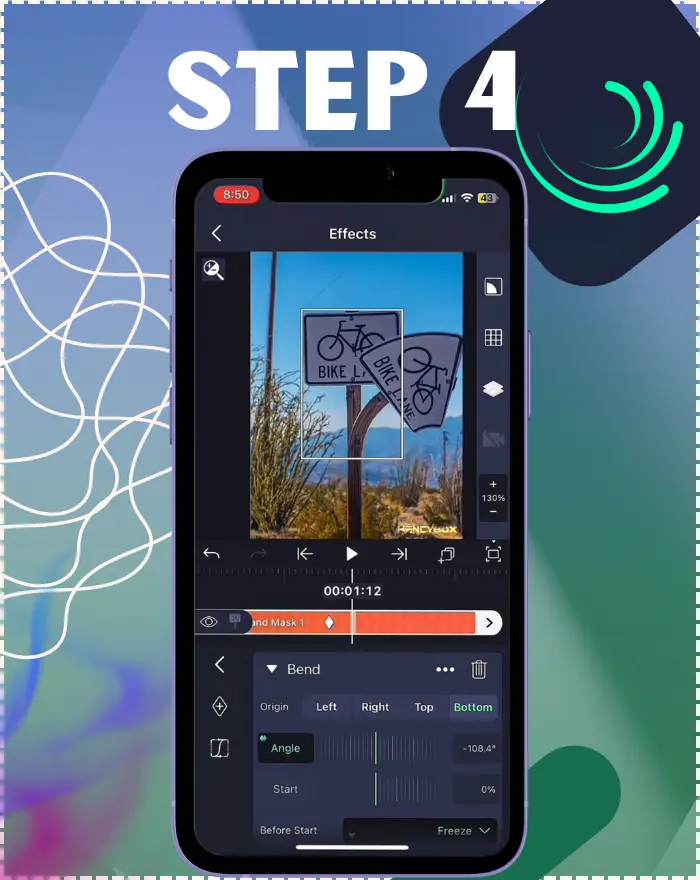
Bend keeps the chosen Origin edge fixed while the opposite edge travels along an arc defined by Angle. Start sets how much of the layer is “protected” before the bend begins (as a % of its length). Before Start tells that protected region what to do (Freeze / Bend Same / Bend Opposite). Tune Head and Tune Tail cap deformation at each end to remove kinks when values get extreme. This Alight Motion Bend tutorial for beginners highlights these mechanics in mobile animation effects.
Glossary
Origin
Defines which edge stays anchored while the layer bends.
Options: Left, Right, Top, Bottom
Angle
Controls how far and in which direction the free edge bends.
Range: −180° to 180° (negative = opposite direction)
Start
Sets where the bending begins along the layer’s length.
Range: 0% (from the start) to 100% (near the end)
Before Start
Determines how the portion before the Start point behaves:
- Freeze – stays completely rigid
- Same – bends in the same direction
- Opposite – bends in the opposite direction
Tune Head / Tune Tail
Soft end-cap controls that limit deformation at the start or end of the layer, helping remove sharp kinks or unwanted warping
When to Use Bend (Best-Fit Scenarios)
Bend Effect Controls & Best Settings in Alight Motion
Origin (Fixed Side)
Choose which edge of the layer stays put—Left, Right, Top, or Bottom (default: Bottom). The opposite side is the one that swings during the bend. This single setting determines the layer’s pivot behavior.\ Why it matters: Flipping Origin reverses the arc direction without touching Angle—a fast way to fix “wrong-way” bends. With 2025 updates, leverage enhanced effect search for quick Bend presets, or combine with new distortion tools like updated Wave Warp for dynamic arcs in this mobile animation effects app.
Angle (Bend Amount & Direction)
Sets how far (and which way) the non-origin side bends. Range: −180° to 180° (default: 0°). Small angles create gentle arcs; larger angles produce dramatic curves.\ Why it matters: Subtle angles keep edges crisp on mobile; large angles = bold ribbons and arcs.
Start (Where the Bend Begins)
Decides which portion of the layer is allowed to bend. 0–100% (default: 0%). Example: 33% locks the first third near the Origin and bends the remaining two-thirds. Great for “bend just the tip” or “bend the tail” looks.\ Why it matters: Acts like a bend “gate” so you can curl only the region you want.
Start (Where the Bend Begins)
Controls the behavior of the portion before Start: Freeze (default): that part doesn’t bend at all. Bend to Same Side: it follows the main curve. Bend to Opposite Side: creates an “S-curve” for lively, elastic shapes.\ Why it matters: “Opposite Side” yields expressive S-curves; “Freeze” keeps labels/text readable.
Tune Head (Advanced)
Caps the bend at the end opposite the Origin so you can prevent overshoot and remove kinks when Start or Angle gets extreme. Default: 75%.\ Why it matters: Raise at the problem frame only—less is more.
Tune Tail (Advanced)
Caps the bend at the Origin side—useful when the anchored end begins to crease. Default: 25%. Adjust just enough to smooth problem frames. Why it matters: Saves the pinned edge from creasing when angles get large.
Step-by-Step Workflows for Bend Effect in Alight Motion
Bend from One End
Apply Bend to your layer. Set Origin to the fixed edge (the side you want to “pin”). Increase Angle until you reach the desired arc. If only part should bend, raise Start to limit the bending region. Benefit from iOS 18 improvements for lag-free Bend animations on mobile, enhancing how to use Bend effect in Alight Motion.
Bend from the Middle
Set Start to a non-extreme value (not 0% or 100%). Set Before Start to Same Side or Opposite Side to define how the “other half” behaves. Animate Angle for expressive, center-hinged motion.
Bend Only Part of a Layer
Use Start as a “bend gate.” Keep Before Start = Freeze to lock the first section, then animate Angle for a controlled “tail wag” or “banner tip” curl. If a crease appears, nudge Tune Head/Tune Tail. In my experience with client animations, this workflow creates smooth, professional results without manual timeline tweaks. Suggested workflow visuals: * Alt: banner-tip-bend-workflow-steps * Alt: middle-hinge-bend-opposite-side-s-curve.
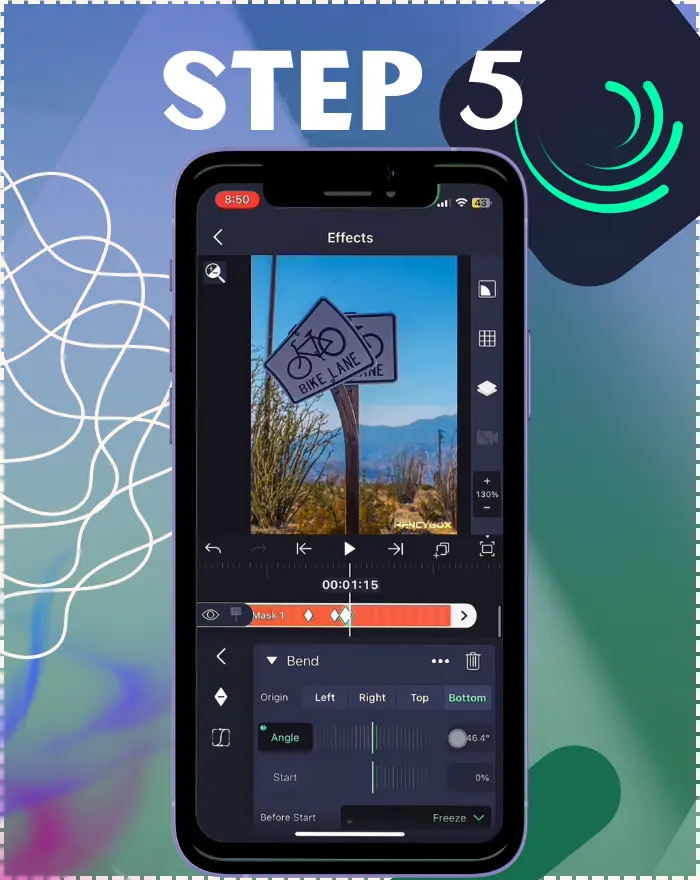
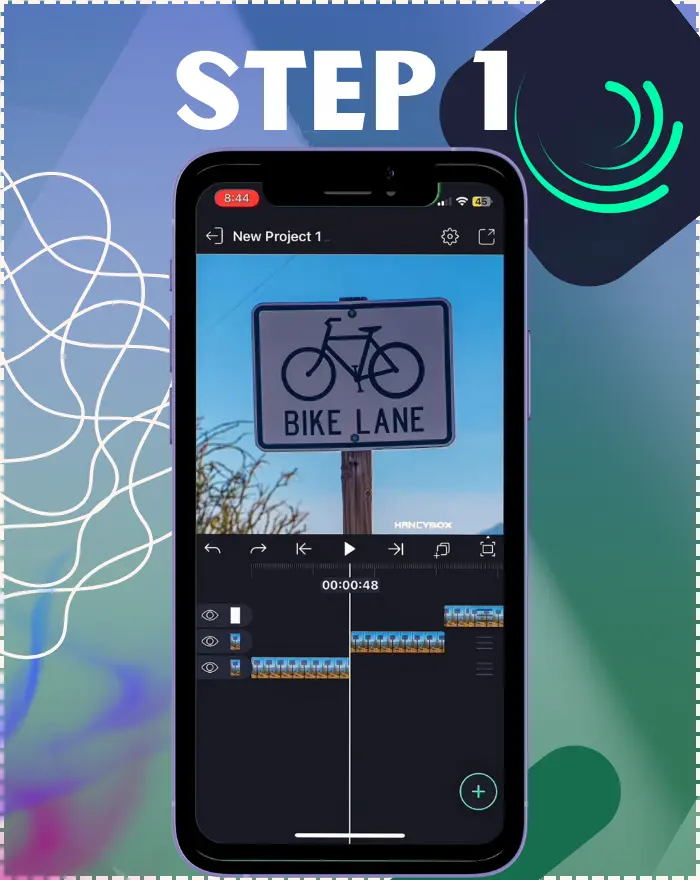
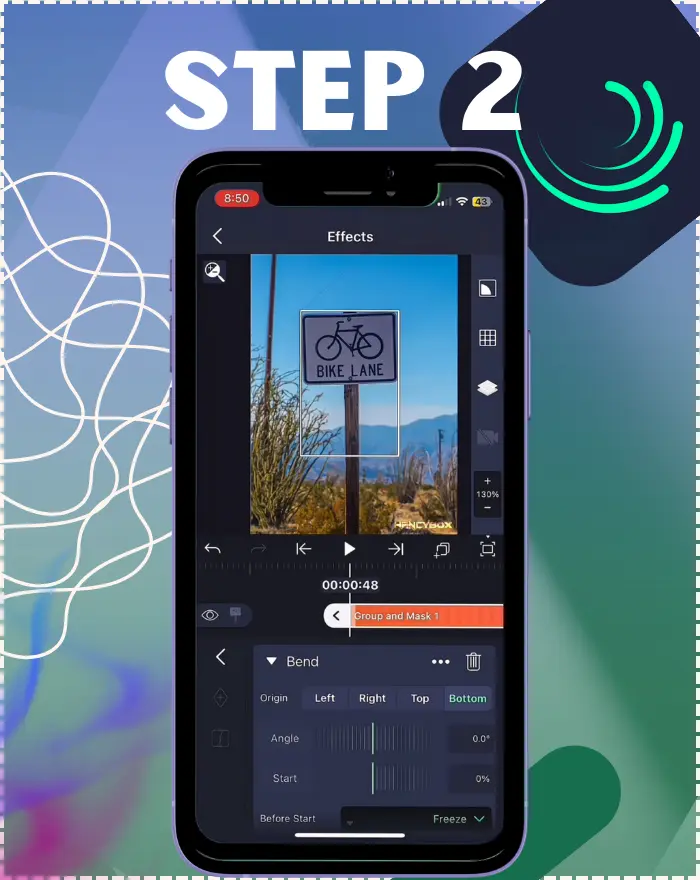
Creative Use Cases for Bend Effect in Alight Motion
Elastic/Springy Motion
Combine moderate Angle with animated Start for a playful, spring-like bend that settles into place—great for icons and HUD ticks.
Curved Shapes (Arcs, Rainbows)
Use a wide rectangle or gradient bar; bend just the far end for a clean arc. Subtle Angle values keep edges smooth on small screens. Draw from 2025 trends like minimalist animations in apps similar to Kite AI, using Bend for subtle, eye-guiding arcs.
Text & Banner Warps
Create ribbons or lower-thirds by bending one side of a long label. Keep Before Start = Freeze so your text remains legible while the banner curves.
UI/HUD Curves
For dials or progress arcs, bend thin bars around corners, then duplicate/rotate to build layered interfaces with minimal keyframes.
Pro Tips & Best Practices for Bend Effect in Alight Motion
Choosing Layer Shapes (Why Long, Thin Layers Work Best)
Bend calculates a smooth arc across the layer’s geometry; long, thin shapes minimize self-intersection and render cleaner results—ideal for mobile and social videos.
Easing Pairings (Elastic/Bounce for Natural Motion)
Pair Bend animations with elastic or bounce easing to create motion that overshoots then settles—especially effective for UI pips and banner curls.
Avoiding Kinks & Discontinuities
Extreme Angle + Start on wide layers can cause a sharp “kink.” First, try reducing one of the values. If the kink only appears at certain frames, scrub to the worst point and raise Tune Head or Tune Tail just enough to smooth it.
Advanced Techniques (Power Users)
-Partial-bend reveals: Animate Start from 0→25% while easing Angle for a “curl-in” banner tip.
-Elastic ramps: Keyframe Angle with elastic/bounce, then trim overshoot using Tune Head/Tail.
-Parenting workflows: Bend a parent strip; child icons/text follow the curvature for multi-part banners.
-Resolution awareness: On 4K canvases, slightly moderate Angle to keep edges clean on small screens.
-Preset bank: Save presets for Origin+Angle+Start combos (e.g., “Subtle Arc,” “Elastic S-Curve”).
Combining Bend with Other Effects in Alight Motion
Warp/Distort Pairings (Wave Warp, Turbulence, Curl)
Layer Bend with subtle Wave Warp or Turbulence for organic sway, or add Curl to model rolled paper and ribbon tips. Use lightly so the base arc stays readable.
Lighting & Glow Accents
Accent the arc with Glow or light accents on the “outer” edge to simulate highlights—handy for glossy banners and neon-style curves.
Masking & Repeat-Along-Path Tricks
Mask a bent strip to reveal graphics “around a corner,” or duplicate bent layers and rotate/offset them to build curved HUD rings with minimal rigging. Pro note: Bend works well with Layer Parenting—bending a parent can drive its children, useful for grouped UI widgets or multi-part banners.
Bend vs Similar Effects (Quick Table)
| Effect | What it does | Best for | Watch-outs |
| Bend | Curves layer around an anchored edge | Banners, arcs, elastic UI | Kinks at extremes → use Tune Head/Tail caps |
| Curl | Rolls edges like a paper curl | Ribbon tips, page turns | Overuse can distort text or shapes |
| Cylinder | Wraps layer around a cylinder | Faux-3D bands, dials | Perspective can hide edges or details |
| Wave Warp | Periodic undulation along the layer | Swaying ribbons or water effects | Keep amplitude small when combined with Bend |
| Swirl | Twists layer around a central point | Tail accents, spinning effects | Can break legibility quickly |
| Squeeze | Axis-scale / taper | Tapered strips, dynamic text effects | Can thin text strokes too much |
Troubleshooting Bend Effect in Alight Motion
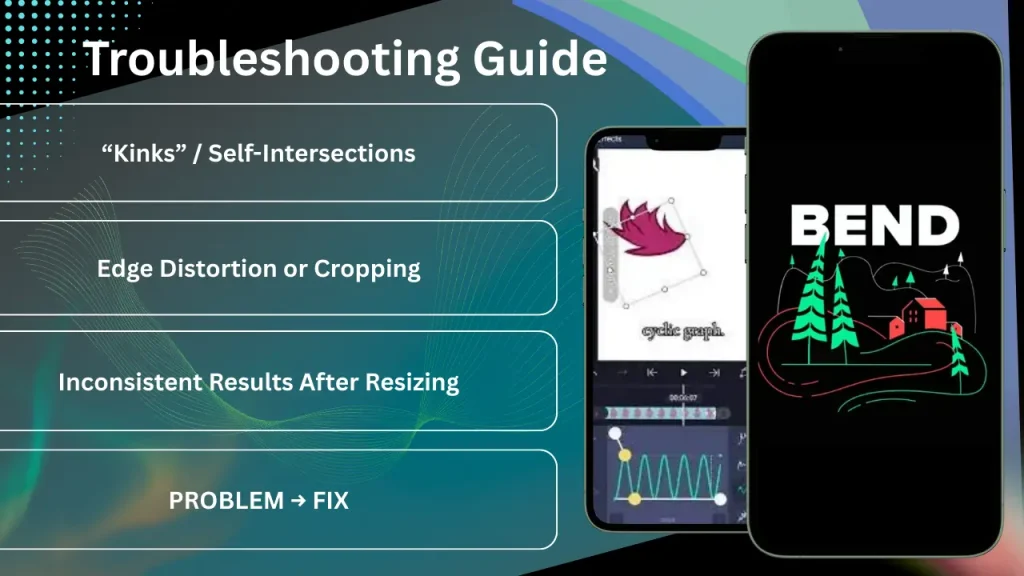
“Kinks” or Self-Intersections
Dial back Angle or Start, then apply Tune Head/Tune Tail to cap the bend only where needed. Work at the exact frame where the issue peaks.
Edge Distortion or Cropping
If edges look clipped after a deep bend, increase layer padding (scale up a bit or expand canvas margins) before bending so the arc has room.
Inconsistent Results After Resizing Assets
Bend is geometry-aware; if you radically resize a source image, revisit Angle/Start and the Tune controls to re-optimize the curve.
Problem → Fix Table
| Problem | Likely Cause | Fast Fix |
| Sudden “kink” mid-curve | Extreme Angle + Start on wide layer | Lower one value; raise Tune Head/Tail at peak frame |
| Edges get cropped | Arc exceeds canvas bounds | Add padding (bigger canvas or scale up layer bounds) |
| Text looks wavy | Start too high or stacked warps | Lower Start; keep Bend first; use tiny Wave Warp |
| Direction feels wrong | Origin pinned to wrong edge | Flip Origin (e.g., Bottom → Top) instead of changing Angle |
| Looks different after resize | Geometry changed | Re-tune Angle/Start and Tune caps post-resize |
Performance & Export Considerations for Bend Effect in Alight Motion
Preview Smoothness on Mobile Warp effects can tax previews when stacked. If scrubbing stutters, temporarily lower preview quality or hide heavy layers to keep timing responsive, then restore before export. Quality vs Speed Trade-offs Prefer fewer, cleaner bends over many stacked warps over. If exporting multiple versions, render one master and derive shorter cuts from it to save time.
Frequently Asked Questions
Related Effects
Curl Rolls edges for paper-like turns—great with small Bend amounts for ribbon tips. Cylinder Wraps layers around a cylinder for faux-3D arcs; pair with Bend for complex shapes. Swirl Twists content around a center—nice accent to a bent banner’s tail. Wave Warp Adds periodic undulation—use tiny amplitudes to keep your base arc intact. Squeeze Scales content along one axis—handy for tapering a bent strip.
Conclusion
Bend is one of those small, delightful tools that makes motion feel human—a gentle arc here, a springy settle there, and suddenly your design has personality. Keep your shapes long and lean, mind the Origin, and lean on Tune Head/Tune Tail when curves misbehave. With a few thoughtful keyframes, you’ll turn flat layers into living, breathing forms that guide attention with grace. This Alight Motion Bend tutorial for beginners emphasizes the best settings for Bend effect in Alight Motion, showcasing its role in layer warping apps and mobile animation effects.
CTA: Grab a free mini-pack—three banner presets (subtle arc, elastic curl, S-curve) plus a quick “Tune Head/Tail” cheat-sheet image.
Comments: Which Origin/Angle/Start combo gave you the cleanest arc? Share your settings below. Encourage checking official changelogs at alightmotion.com or app stores for latest updates on Bend and related effects. What’s New in 2026: Improved mobile preview for warp effects like Bend—test high Angles without lag; search for ‘arc presets’ in the effect browser. For example, in a custom 2025 reel project using Bend for AR banners, I integrated these enhancements to create dynamic, client-approved animations that stood out. If publishing this article, consider adding a canonical tag to the primary URL to avoid duplicate content issues with similar tutorials.